Cleaning a deep-fryer can easily become one of the most dreaded chores in any kitchen – but if you clean it regularly not only will it be easier, but the fryer itself will work better and last longer. In this video lesson, Chris walks you through every step to restore your fryer to showroom quality!
Before taking action from the content or resources published here, we request that you visit and review our terms of use.
Title photo copyright James Lee
Transcript:
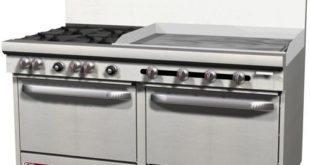
Hi, I’m Chris Tavano for Tundra Restaurant Supply and in today’s episode we’re going to show you how to properly clean and maintain your fryer. Let’s start with the basic overview of the anatomy of a fryer. First, we have our fry baskets. Next, we have our fry basket hanger. This is removable and replaceable. Before we get to the basin let’s go to the bottom, open the door. Here we have the thermostat. Next, we have the safety valve. Beside that we have the pilot switch. Above all of that are your pilot orifices that go right into your burner valves, which are into the flumes of the basin of the cavity of the fryer. Then this big one right here is our drain valve. This extra piece right here is our drain valve extension so that way it goes into a bucket. Oftentimes you’re going to need a drain valve poking rod in case some of that soot gets clogged up in there, but before we go further we’ve also got some other components up top.
Your fryer screen which is in the basin just above the burners. Then if you notice right here we have our thermostat probe and our high limit probe. These are very sensitive and fragile and we have to be careful how we clean around these probes. Before you start doing any kind of cleaning on your fryer be sure that you’re equipped with the proper safety gear and equipment. Let’s do a run down. First, I got my nice trusty goggles for any kind of splash back or chemicals that get in your eyes, very key. Next, I got some nice Nitrile gloves to keep you from, again, some of those chemicals that boil out. Again, it protects you from the heat. Again, that oil in that basin’s still going to be very, very hot. Next, I got my burn guard apron. Again, to prevent from any kind of splash back of hot oil or grease getting onto my skin.
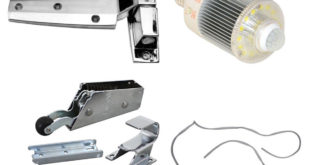
First, we have our drain valve extension. Next, we have a fryer coil brush to get in between your burners and deep down in that basin. Next, we have a basic scrub brush to get anything on the surface. Next, we have our drain valve poking rod in case it ever gets clogged in that drain. Last but not least, we have a nice thick walled stock pot to catch the hot oil once we drain it. Be sure that you don’t use anything like aluminum or definitely not plastic. That oil’s still going to be very hot and it’s going to melt. Be sure you’re using something thick and sturdy. All right, right before you’re about to drain and clean your fryer you’re going to want to make sure you turn the thermostat in the off position. You do not want these burners going as you’re trying to drain and clean this unit.
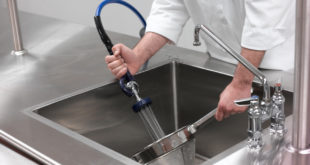
Once you turn off the thermostat this is also a great moment to go get your supplies and equipment for the cleaning and the draining process. The nice thing about that is it’s going to give the unit and the oil about fifteen, twenty minutes to start cooling down but it’s not going to get so cold to where the oil coagulates and is kind of difficult to drain through the assembly. Next, you’re going to want to put on your drain valve extension. Be sure that you have the opening facing down into your receptacle. Next, we can place our stock pot right underneath that and then very slowly we’re ready to start draining. Slowly start opening the valve. You’re going to see the flow starting to increase. Keep your hand on the valve control because this is a great way to control the flow of the oil so that way it just doesn’t dump out and splash hot oil all over you. Again, that is why we have the safety equipment though.
Once your old oil is done draining you can go ahead and close the valve. Then we can go ahead and remove our vessel to be discarded with our old oil or recycled. Now we can start scrubbing up top. The most important and critical part to cleaning the basin of your fryer unit is keeping in mind of these thermostatic probes. These are very fragile and very sensitive and if they get banged around too much they can easily break and then there’s bigger concerns and issues to deal with on your fryer unit. We’re going to grab our fryer coil cleaning brush and just be sure that you’re going down in between these flumes and giving a nice good scrub. Another good thing is this coil has an L, like a little elbow, so that way you can get underneath your burners and get the bottom edge of those as well. Again, when you go in the middle of this one, very, very careful that you don’t get too close to these probes.
Once you’ve got your burner flumes scrubbed off pretty well without banging around your probes we can go ahead and get our other brush to help scrub off other components, other areas of the basin. Keep in mind there may be some residual grease left on the walls and the bottom of the basin of the fryer unit. However, that’s actually a good thing because it acts as a lubricant to help scrub some of those more difficult areas. Now that we’ve scrubbed most of the residual residue away from the basin we’re ready to boil out the basin and get it extra clean. Two ways to do that, you can get fryer pucks or you can use your common grill degreaser. First thing first, be sure that your valve is closed and then we’re going to fill the basin halfway with hot water. Once it’s filled with hot water you can throw in one fryer boil out puck or you can add approximately one cup of your common degreaser that would fill approximately eight gallons of hot water.
Once that’s full go ahead and throw your thermostat up to three hundred and fifty degrees, and we’re going to want to boil that solution for about fifteen to twenty minutes. Once you’ve boiled that solution for about fifteen, twenty minutes be sure you turn your thermostat off and then now we can proceed to drain that solution like we did the hot oil from earlier. Once you’ve drained all your cleaning solution you’re going to want to be sure that you rinse out the basin one last time with just clean water to be sure there’s no residual chemicals before you put in your new batch of fryer grease. What you want to do is just keep your drain open and start rinsing it out with hot water, whether it comes from your hose or a giant bucket, and you can go ahead and just let it drain onto the floor drain or you can drain it into a basin, or a vessel, or a receptacle and discard into your basin sink.
Again, you can just let it go right on the floor and right into your floor drain. I’m Chris Tavano for Tundra Restaurant Supply, and that’s how you properly and safely clean your fryer. If you have any further questions please comment below or call our sales floor directly, and please subscribe.
Why are you cleaning a brand new fryer? I want to see a fryer and a fry cook with some experience clean it. Thanks for the handy tips though. Can’t wait to see the looks on my cooks face when I give them safety goggles to clean the fryer tonight.
Mike, you’re right, this was a floor model fryer and most fryers in the restaurant aren’t as nice and shiny as this one! However, I can tell you that Chris (the guy in the video) has plenty of kitchen experience and his tips are reliable. Thanks for the comment!
This unit was the floor model in our showroom, and had to conduct a mock version until we were able to get to a test kitchen. Keep an eye out for that video shortly.
With my experience, there is more than one way to actually clean a commercial fryer,and ultimately depends on your unit and environment. This was the most applicable solution we had, until the test kitchen version that is to release in the next couple of weeks.
Let us know if you have any other specific questions that we can help you with.
Thanks again!
Great post about cleaning a deep fryer. I love how in-depth this article is. I used to work in a large kitchen at a cafeteria where we had several deep fryers that we had to clean three times a week. Your post explains the process very well. Great work!
Thank you so much for this!