
Converting any piece of gas equipment from natural gas to propane or from propane to natural gas is fairly simple and can be accomplished in 5 easy steps.
Parts needed to convert the equipment:
- Burner Orifices
- Pilot Orifice
- Regulator
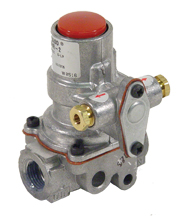
- Combination Safety Valve conversion kit
- Nomenclature (tag on unit that has model and serial number on it).
ALWAYS REMEMBER TO TURN OFF ALL GAS TO THE UNIT!!
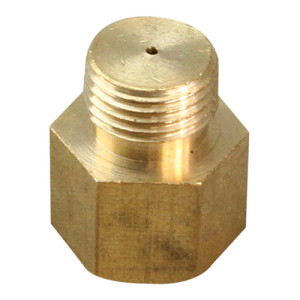

1. Replacing burner orifices. First, the most important thing you need to know is the brand name, model and serial numbers of your unit. Next thing you will need to know is what altitude the unit you are converting is at. This will determine what orifice size you will need. You will also need to know the number of top burners as well as any other burners such as oven burners and the number of oven pilots (if you are converting a range). The conversion can be done one of two ways: either by using the manufacturer’s conversion kit or with individual parts. The conversion kits can be more expensive than using individual parts.
The conversion can take some time because whatever piece of equipment you are converting has to be dismantled and then reassembled. Begin by removing all the burners and then remove what is needed to be removed in order to access the burner valves. The burner valves do not need to be removed. Remove the old orifices and install the new orifices (orifices are screwed to the end of the valve).
2. Replace pilot orifices. If you are converting an oven, you also need to change the pilot orifice. The pilot tube is attached to the pilot with a nut. Unscrew the nut and pull the tube out of the pilot assembly. When the tube is pulled out, the orifice should fall out; if it does not, tap the pilot assembly. Replace the pilot orifice and reassemble. Reassemble the unit the same way you took it apart (you are almost done!)
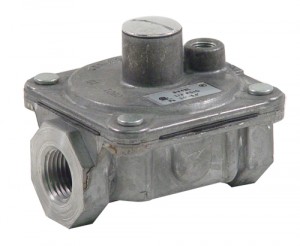

3. Replace the gas regulator. You must change the gas regulator usually found at the back of the equipment. Remove the old regulator and install the new regulator, making sure that the gas flow direction is accurate. The regulator has an arrow on the bottom of it and it must point toward the piece of equipment.
Reconnect the gas hose, turn on the gas and check all connections for leaks. This can be done with soap bubbles – wipe soapy water onto the connections and look for places where it bubbles up, indicating a leak. Light all your pilots (it may take a little time to purge out all the air). Adjust the pilots to the correct flame height by turning the adjustment screw on the pilot valve. Now turn on one burner at a time (you want a nice blue tip flame). If there is yellow or orange in the flame you will need to adjust the air shutter on the burner to correct the flame. This goes for top burners as well as the oven burners.regulator, making sure that the gas flow direction is accurate. The regulator has an arrow on the bottom of it and it must point toward the piece of equipment.
You can special order a conversion kit easily by calling 1-888-388-6372.
5. Replace the unit’s nomenclature. By law, the nomenclature must also be replaced. This is only available through the manufacturer of the piece of equipment being converted. Sometimes it takes awhile to get them, so until you get the replacement, you should remove the word “natural” from the tag with a magic marker and write in large letters, “LP”. When you receive the new tag, simply stick it over the old one.
You have now converted your equipment from natural gas to propane or vice versa.
Congratulations!